
CAD discussion forum - ask any CAD-related questions here, share your CAD knowledge on AutoCAD, Inventor, Revit and other Autodesk software with your peers from all over the world. To start a new topic, choose an appropriate forum.
Please abide by the
rules of this forum.
How to post questions: register or login, go to the specific forum and click the NEW TOPIC button.
| Author |
 Topic Search Topic Search  Topic Options Topic Options
|
Zuhaib 
Groupie

Joined: 30.Dec.2015
Location: Pakistan
Using: AUTOCAD 2018
Status: Offline
Points: 79
|
 Topic: MATCHPROP Topic: MATCHPROP
Posted: 22.Nov.2019 at 05:55 |
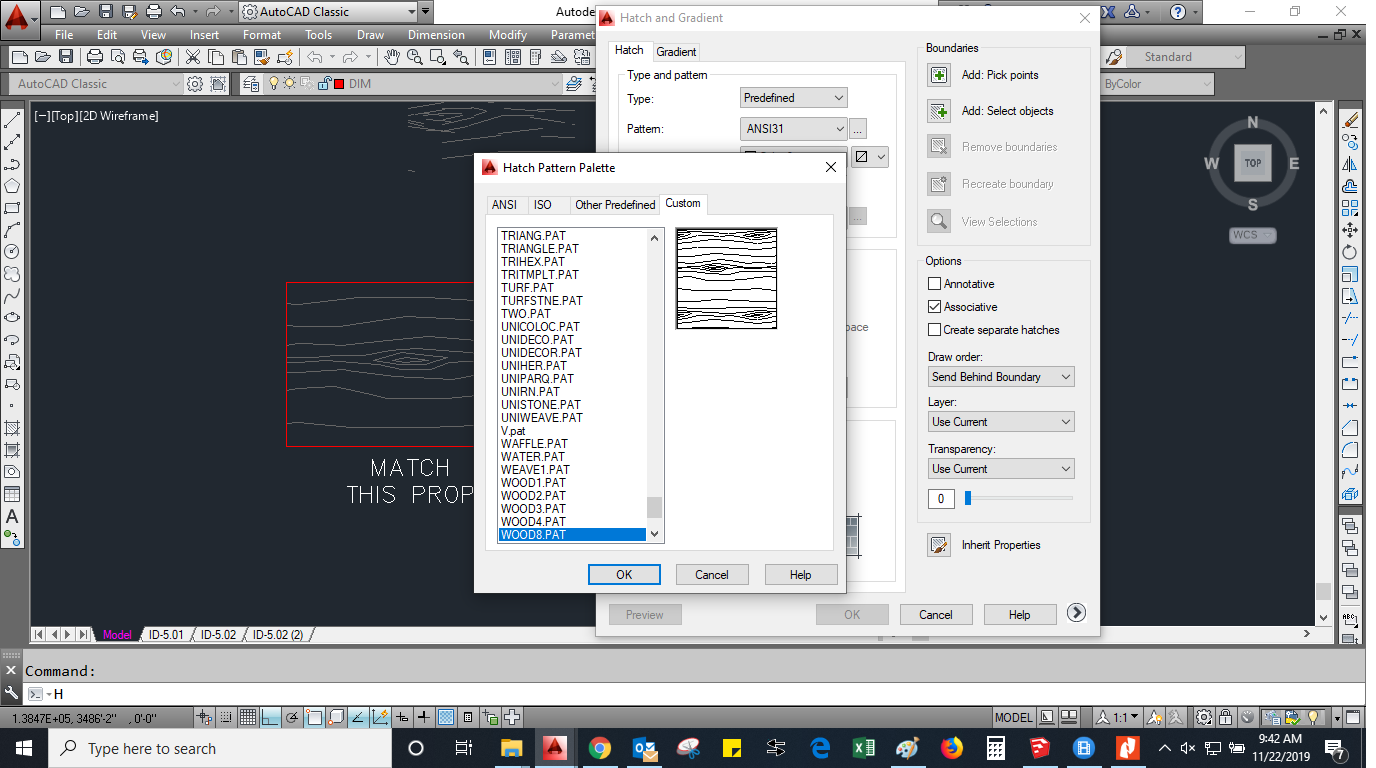
Dear Kent Thanx for picture help but dear its still not working for me. its a custom hatch as shown in the picture. Could it be the problem of custom hatch?
Edited by Zuhaib - 22.Nov.2019 at 05:56
|
|
THANKING YOU
REGARD: ZUHAIB KHAN
|
 |
Zuhaib
Groupie
Joined: 30.Dec.2015
Location: Pakistan
Using: AUTOCAD 2018
Status: Offline
Points: 79
|
Posted: 22.Nov.2019 at 05:28 |
|
always use that command.
|
|
THANKING YOU
REGARD: ZUHAIB KHAN
|
|
Kent Cooper
Senior Member

Joined: 12.Mar.2013
Location: United States
Using: AutoCAD2020, 2023
Status: Offline
Points: 626
|
Posted: 21.Nov.2019 at 15:23 |
 Zuhaib wrote: Zuhaib wrote:
Dear @KENT its not the problem of origin . its the problem of result after matching the hatch properties by using MATCHpROP. |
You must have Hatch properties not selected in your MATCHPROP Settings. Start MATCHPROP, pick the source Hatch pattern, choose the Settings option, and I suspect you will see this in regard to the highlighted piece:
The piece of Hatching visible to the left has its origin in the middle [you can see the greenish UCS icon], and the one visible to the right has its origin at 5000,5000, so it's distorted similar to your original image.
When I MATCHPROP with this Special Property un-checked, as shown, I get what you describe [the target Hatch only gets the basic properties like Layer, color, etc. matched], but if I check that button at Hatch in Special Properties, then it works as you intend [properties specific to Hatch patterns, such as origin and scale, are also matched].
Edited by Kent Cooper - 21.Nov.2019 at 15:27
|
|
philippe JOSEPH
Senior Member
Joined: 14.Mar.2011
Location: France
Using: AutoCAD Mechanical 2017
Status: Offline
Points: 1426
|
Posted: 21.Nov.2019 at 13:16 |
|
Hello Zuhaib, I hope all this is not only a problem of REGEN, try this command and after I won't know.
|
|
Zuhaib
Groupie
Joined: 30.Dec.2015
Location: Pakistan
Using: AUTOCAD 2018
Status: Offline
Points: 79
|
Posted: 21.Nov.2019 at 09:23 |
|
Dear @KENT its not the problem of origin . its the problem of result after matching the hatch properties by using MATCHpROP.
|
|
THANKING YOU
REGARD: ZUHAIB KHAN
|
|
Zuhaib
Groupie
Joined: 30.Dec.2015
Location: Pakistan
Using: AUTOCAD 2018
Status: Offline
Points: 79
|
Posted: 21.Nov.2019 at 09:17 |
|
I did that . But after using (MATCHPROP) matching the properties, the hatch is not proper as it should be.
|
|
THANKING YOU
REGARD: ZUHAIB KHAN
|
|
philippe JOSEPH
Senior Member
Joined: 14.Mar.2011
Location: France
Using: AutoCAD Mechanical 2017
Status: Offline
Points: 1426
|
Posted: 21.Nov.2019 at 08:46 |
Kent and the others, now that the hatches have "grips" ( 4 in the case of those rectangles ) we can even copy them and re-grip or strech them, etc... In some cases when hatching isn't working easily and for some repetive hatching I would make a "bank" of hatches with 3, 4, 5, 6, etc... grips to copy, re-grip, stretch. And what I said about making a good hatch at the very first try otherwise the MATCHPROP won't work fine I experienced it years before today. When I do a first hatch on a file, if it's not OK for me ( mainly scale and angle ) I erase it and do the settings for it to be OK directly AND NOT MODIFIED WITH THE PROPERTIES PANNEL ( Ctrl+1 ) until i's good.
Edited by philippe JOSEPH - 21.Nov.2019 at 08:55
|
|
Kent Cooper
Senior Member
Joined: 12.Mar.2013
Location: United States
Using: AutoCAD2020, 2023
Status: Offline
Points: 626
|
Posted: 20.Nov.2019 at 21:07 |
philippe JOSEPH wrote:
.... as the hatches are done in the model space and not seen from viewports the origins must at each corner of the 2 rectangles that I suppose to be of the same size, correct or not ?
|
Not necessarily at a corner, but yes, if the patterns should "sit" in the same relationship to the rectangular outline of each, then each one's origin should be at the same place in relation to its rectangle [a corner, the middle, whatever puts the "graining" part of interest where they want it].
Edited by Kent Cooper - 20.Nov.2019 at 21:07
|
|
philippe JOSEPH
Senior Member
Joined: 14.Mar.2011
Location: France
Using: AutoCAD Mechanical 2017
Status: Offline
Points: 1426
|
Posted: 20.Nov.2019 at 20:22 |
|
OK Kent but as the hatches are done in the model space and not seen from viewports the origins must at each corner of the 2 rectangles that I suppose to be of the same size, correct or not ?
Edited by philippe JOSEPH - 20.Nov.2019 at 20:23
|
|
Kent Cooper
Senior Member
Joined: 12.Mar.2013
Location: United States
Using: AutoCAD2020, 2023
Status: Offline
Points: 626
|
Posted: 20.Nov.2019 at 17:00 |
|
That misalignment of pieces in the right-side pattern looks like a simple problem of the Hatch origin being very far away from its content, which can result in that kind of thing with patterns that involve non-orthogonal pieces (because of rounding to a limited number of decimal places in the angles and origin points and pen-down/pen-up cycles). Try setting the origin of the target Hatch within it or at least a lot closer to it.
Edited by Kent Cooper - 20.Nov.2019 at 17:02
|
|


 Discussion forum


 MATCHPROP


 Tweet
Tweet
