Over 1.111.000 registered users (EN+CZ).
AutoCAD tips, Inventor tips, Revit tips, Civil tips, Fusion tips.
The new Beam calculator, Spirograph generator and Regression curves in the Converters section.
 CAD tip # 12287:
Question
A
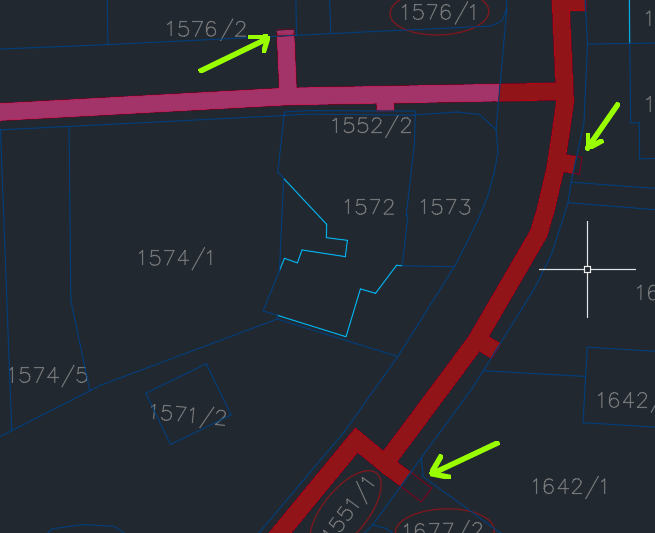
When hatching large, especially long objects using the flood-fill method - i.e. with the option "Specify internal point:" - you may encounter the problem that some boundary lines are not honored. See the pink part of the flood solid hatch:

There are multiple solutions:
- Instead of the internal point method, perform the hatching using the boundary (object) selection method.
- Split the long object into shorter ones using auxiliary "partition" lines and hatch them one by one.
- Instead of using objects "on screen", force your AutoCAD to work with a specified set of potential hatch boundaries. You can do it this way: in the HATCH command, choose the fill type and then use the option "seTtings". Expand the dialog with the bottom right arrow, click on "Boundary set > New" and use window selection (or step by step selections, or just ALL - but watch any switched-off layers) to select objects along the hatched area - e.g. a buffer-zone. Then zoom in closer as necessary and click the point inside the zone.

You can predefine this procedure to a LISP function or a menu macro - and then assign it e.g. to a ribbon icon or to a keyboard shortcut.
The LISP function (a new command "FHATCH") can e.g. look like this:
(defun C:FHATCH ()
 (setvar "HPNAME" "SOLID")
 (command "_-HATCH" "_Adv" "_Bound" "_New" "_ALL" "" "")
)
The menu macro (a new command in CUI, also for LT) can look like e.g. this:
^C^C_-HATCH;_Adv;_Bound;_New;_ALL;;;
ACADACLTCivilMapADT
25.6.2019
36878×
this tip shared by ARKANCE experts applies to: AutoCAD · AutoCAD LT · Civil 3D · AutoCAD Map 3D · AutoCAD Architecture ·
![CAD Forum - tips, tricks, discussion and utilities for AutoCAD, Inventor, Revit and other Autodesk products [www.cadforum.cz] CAD Forum - tips, tricks, discussion and utilities for AutoCAD, Inventor, Revit and other Autodesk products [www.cadforum.cz]](../common/arkance_186.png)


