![CAD Forum - tips, tricks, discussion and utilities for AutoCAD, Inventor, Revit and other Autodesk products [www.cadforum.cz]](../common/arkance_186.png "CAD Forum - ARKANCE Community - tips, tricks, discussion and utilities for AutoCAD, Inventor, Revit and other Autodesk products [www.cadforum.cz]")

 What is the ARKANCE Community?
 CAD tip # 4010:
Question
- DWF file can be created by publishing your document to the .DWF format (either with an internal function of your CAD application or by printing to the 'DWF Writer' pseudo-printer).
- To view and print .DWF files you can use the free application Autodesk DWF Viewer. For download on the Download page or directly from www.autodesk.com/dwfviewer-download (incl. autoinstall).
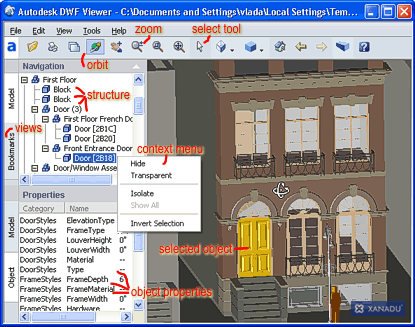
DWF Viewer environment, 'Composite_Model.DWF' file
Using the mouse scroll-wheel or the Zoom tool (or the +/- keys) you can quickly change view/zoom level. Even the file publisher can predefine convenient views - see the Bookmarks pane (DWF Viewer changes views with smooth, camera-like move).
The Orbit tool (Ctrl+L, or pressed middle mouse button/wheel and rotating with the left mouse button) can be used for 3D scenes. The Shift and Ctrl keys can restrict orbits to horizontal resp. vertical plane (maintain Z), Ctrl+Shift will roll. Even in orbit you can use your mouse wheel to zoom.
If your DWF file contains published layer data, you can switch layers off and on individually (see the L key).
If your DWF file contains published object data, you can display this data after selecting a particular object with the Select tool (arrow, A key). Properties of the selected object (highlighted as gold) are displayed in the Properties pane.
Published object structure (from Inventor or Architectural Desktop) is displayed as a tree in the Navigation pane. Any element in this structure can be made temporarily invisible, transparent or isolated (right-click on it).
You cannot modify your DWF file with DWF Viewer. To markup DWF files use a similar application - DWF Composer (now "Autodesk Design Review").
More information on www.autodesk.com/dwf.
